
A blue Crystal Heart.
Blue Crystal Hearts are collectibles throughout the game and are one of the three types of hearts which are used to unlock various gates throughout the game such as Chapter 8 and its alternate sides as well as Chapter 9 past the heart gate in Event Horizon (see this page for more information on the different types of hearts). The following page details how to obtain the blue Crystal Hearts in the game.
Chapter 1[]

Pointless machines
The Crystal Heart in this chapter can be found in Chapter 1's second sub-chapter, Crossing. After passing the house, the player must get on the first Conveyor-Belt Platform in the following room and advance to the second as usual; however, on the second Conveyor-Belt Platform, the player must jump left as they're flung into the air and dash upwards to the left of the up sign, revealing a secret passage. The player must then dash to the left from there to get to the room connecting to this screen's top-left corner. After a few screens, the player will arrive at the location of a computer. Here the Crystal Heart puzzle begins.
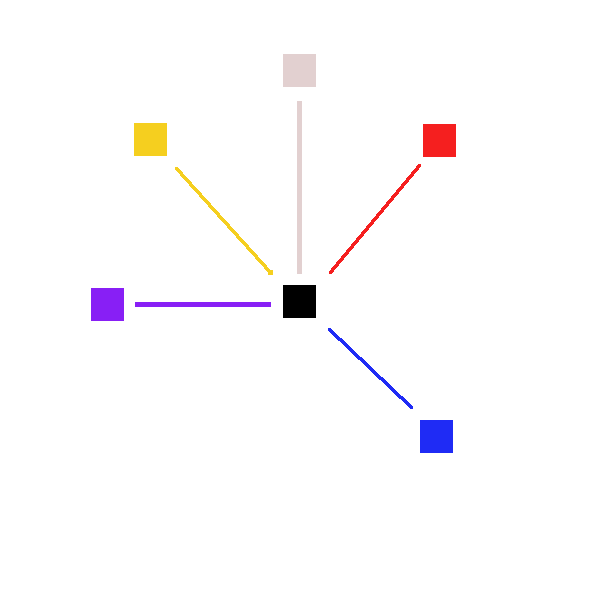
The computer will flash a sequence of colors; nearby, there will be a number of small, colored birds, each of whom corresponds with a color that the computer flashes. The computer will flash a series of colors intermittently, followed by the birds all moving in different directions. To obtain the heart, one must pay attention to the sequence of colors that the computer flashes, as well as the directions that the birds move in every time the sequence finishes. The player must dash in the direction that each bird corresponds to in the order in the computer's light sequence where that bird's color appears on the computer (in relation to the other colors, not in real time). The direction sequence that the player must perform is:
Color Directions
- Up (White)
- Left (Purple)
- Down-Right (Blue)
- Up-Right (Red)
- Left (Purple)
- Up-Left (Yellow)
Performing this series of dashes will cause the birds to form into this chapter's Crystal Heart (entitled Pointless machines) which the player can then obtain.
Chapter 2[]

Resurrections
The Crystal Heart in this chapter is located in Chapter 2's first sub-chapter, Start. In theory, this Crystal Heart should be quite easy to locate, being two screens up from the starting screen of the chapter. In practice, it is very difficult to locate, as there are no objects that will help one to get there. One of the ways to get there is by exploiting a piece of the game's physics that recharges the player's dash when the player moves from one screen to another. This mechanic is not directly taught in the game (although it is indirectly taught when the player attempts to collect an early strawberry in Chapter 3), and for this reason, it is regarded by many as one of the hardest Crystal Hearts to find without a guide. The mechanic allows the player to essentially climb thin air by dashing off of the right side of the first screen onto the second screen, then back, repeating until the player moves up to the screen above the first screen. After climbing up a wall from this third screen onto a fourth screen, the player can then fall down onto the third screen, dash onto the fourth screen, and repeat until one finds a wall. The player can then climb this wall, after which the player can easily reach the topmost screen, where one can simply walk over to this chapter's Crystal Heart (entitled Resurrections) and obtain it.
Another way to get to this crystal heart is to first get onto the second screen, climb up the wall, stand on the left edge of the platform above the second screen, jump to the far left of the platform and then dash left as soon as the player leaves the screen. By doing so, the player lands on the platform on the left and can then continue climbing up towards the crystal heart.
The heart can also be seen (but not obtained) in the Awake subchapter of Chapter 2, where it is easier to locate, and a poem lies near it with hints of how to obtain it:
An apparition
Not of this world
But because of it
Lurking out of frame
Awake, my heart is a fortress
In dreams I am vulnerable
Chapter 3[]

Scattered and lost
The Crystal Heart in Chapter 3 is located in the second sub-chapter, Huge Mess. After being tasked to help clean up by Mr. Oshiro, the player must advance to the lower path of the two in the upper right corner. Once the player reaches and activates the large button to clear the purple and white towels, one must advance not to the left as usual, but to the right. The player must then travel up into the crevice that a stream of water is falling out of to reveal a secret path, leading back to one of the earlier rooms of the path. One must then advance upwards and then to the left (in reverse of the way the player first goes through the area) until the player reaches the first room, where the player first runs into Theo in Chapter 3. There is a path at the top of the screen that was previously blocked by towels; the player must dash up to this path and follow it upward to find this chapter's Crystal Heart (entitled Scattered and lost) and obtain it.
Chapter 4[]

Eye of the storm
Chapter 4's Crystal Heart is located at the very beginning of the second sub-chapter, Shrine. To reach the Crystal Heart, the player must cling to the Guided Platform, then navigate it left to avoid hitting the wall, after which the player should move it back to the right. Once the player lands, the player must go to the right, into the lit up area. Once one goes into the next room, the player should see a waterfall pouring into a pool of water. The player must then swim towards the bottom right corner, and keep swimming to the right until the player reaches a hidden area with a strawberry. The player must then dash into the Smashable Wall to the right to break it, after which the player should reach a tall room. One cannot reach the top normally; the player must crouch on top of the room's idiosyncratic white block until the player disappears. The player is now in the background instead of the foreground, thus allowing one to interact with objects in the background (a trick borrowed from Super Mario Bros. 3, which has a similar block with a similar gimmick). This object interaction allows the player to climb to the top of the screen, where the Crystal Heart (entitled Eye of the storm) is located.
Chapter 5[]

Quiet and falling
Chapter 5's Crystal Heart is located in the second sub-chapter, Depths. After getting the key above the statue, the player must enter the room beneath the statue to the right, then hop on the nearby bubble and travel to the right. Instead of opening the door at the end of the room, the player must enter a second bubble and travel to the left, then dash up into the center of the second platform on their way back. This moves the player into a third bubble that they can use to travel upwards, leading to a secret path above the door. After making their way through the long hallway to reach the next room and going through that room as normal, the player must now head to the bottom of the following room and dash downwards to break the brown Smashable Wall in the floor. This reveals another locked door that they can use the key on, which leads to the Crystal Heart's room. In order to navigate in the room, one must go along the outer edges of the room, using a set of moving blocks and platforms to get to the Crystal Heart (entitled Quiet and falling) and obtain it.
Chapter 6[]

Heavy and frail
Chapter 6's Crystal Heart is located at the beginning of the third sub-chapter, Hollows. At the start of the sub-chapter, the player must use the Angry Platform to break through the wall below to get to the first Feather. One must then use it to fly up-right, and then dash down to break the Smashable Wall, revealing the second Feather. The player must use that Feather to fly upwards, then climb to the third Feather, and finally use that Feather to fly to the left of the screen, revealing an entrance to a secret room. After going through the room and breaking another Smashable Wall, the player will see a puzzle with a statue, 6 colored crystals, 4 torches and 3 symbols.

Bird Color Directions (see Chapter 1)
In order to solve the puzzle, one must repeat the pattern required to obtain the first chapter's Crystal Heart; doing so correctly will light up the first torch. The same thing must be done for the rest, but with slight alterations for each following torch: the second torch's pattern must be the first, but mirrored left-right (e.g an up-left on the first torch must be an up-right dash for the second); the third torch's pattern has to be mirrored up-down (e.g. an upwards dash on the first must be a downwards dash for the third), and the fourth one's pattern must be mirrored both up-down and left-right (e.g. an up-left dash on the first must be a down-right dash for the fourth). For a complete list of directions, see below:
- First torch: Up, Left, Down-Right, Up-Right, Left, Up-Left
- Second torch: Up, Right, Down-Left, Up-Left, Right, Up-Right
- Third torch: Down, Left, Up-Right, Down-Right, Left, Down-Left
- Fourth torch: Down, Right, Up-Left, Down-Left, Right, Down-Right
After lighting up all 4 torches, the Crystal Heart (entitled Heavy and frail) will be granted on top of the statue.
Chapter 7[]

Pink sunrise
To obtain the crystal heart in Chapter 7, you must find six Jewels hidden in each subchapter— a blue star for Reflection at the Start, a sapphire square for Forsaken City at 500 M, an emerald oval for Old Site at 1000 M, a gold circle for Celestial Resort at 1500 M, a pink diamond for Golden Ridge at 2000 M, and a white pearl for Mirror Temple at 2500 M. You obtain the crystal heart in 3000 M after getting all the Jewels.
Star[]
The first Jewel is located at the end of the last screen of the Start subchapter. After bouncing off of the last Spring, the player must use both dashes to jump over the final Purple Orb, then climb up the wall on the right. The screen should move, revealing the first Jewel.
Sapphire[]
The route to 500 M's Jewel starts in the sub-chapter's 3rd screen, where, after going up on the first Traffic Light Block, the player must go left instead of going right at the intersection. The player should then go right after climbing to the top of the tall screen that follows. In the following room, just to the right of the second Traffic Light Block, there is a tiny gap in the ground, which the player must fall through to find the room with the second Jewel. Completing the spike-lined obstacle course will allow the player to obtain this Jewel.
Emerald[]
For 1000 M's Jewel, the player must go through the upper left or upper right route of the 5th screen of the subchapter. If you choose the upper left route, you have to go up through the first Space Block, then use the Space Block on the right to break a Smashable Wall. You will then enter into a room with a strawberry. Going up through the spiked platform will lead you to the path to the Jewel. Going the upper right route will skip the berry. The player must dash to the right in the middle of two Space Blocks to break a Smashable Wall; breaking this wall will reveal another room with Skull Binoculars, as well as with a concealed Disappearing Platform which the player must stand on to fall to the chamber below. Completing this chamber will allow the player to obtain this Jewel.
Gold[]
1500 M's Jewel is at the end of the 7th screen of the subchapter and is probably the easiest one to find. Below the exit upwards into the 8th screen, a broken wall can be seen. Going through there and completing the room that it reveals will allow the player to obtain this Jewel.
Diamond[]
2000 M's Jewel is a trek to get to. To the left of the second room is a seemingly pointless room. In one of the gaps above the player (the widest one above the pit of Crystal Spikes), there is a secret platform to stand on, which the player can use to jump all the way to the left of the screen. In the next screen, there is a broken area of the roof, providing another entrance to a secret platform. The player must get there, jump off to the left, dash up to the left, and then dash up as soon as the player is past the wall that they need to climb up. Going up through the hole will reveal the Jewel.
Pearl[]
To reach 2500 M's Jewel, the player must take the first Red Bubble left, causing it to break the wall at the left of the first screen. The player must then enter the Red Bubble in the newly revealed screen and take that to the right, causing it to break several more walls before it eventually stops moving. The player must then go up and complete the following screen to obtain this Jewel.
Crystal Heart[]
At checkpoint 28 at 3000 M, the player must dash under the gap in the wall to the player's right, causing the camera to move and reveal the room with the Crystal Heart. If the player has all of the Jewels, they will pop out of the floor, and the Crystal Heart (entitled Pink sunrise) will move to a place where the player can obtain it.
Chapter 8[]

Heart of the mountain
The Crystal Heart in Chapter 8 is the most straightforward to obtain, as it is required to obtain at the end of the fourth subchapter, Heart of the Mountain, to complete the chapter. After getting past all of the chapter's obstacles, the player can complete the level and simultaneously be awarded the Crystal Heart (entitled Heart of the mountain).
Trivia[]
- The Jewels in Chapter 7 appear to be based on the Jewels in the character select screen in TowerFall, matching in both shape and color.